Valentines Day Oreo Pops Recipe
- Time: Active 1 hours 30 mins, Passive 15 minutes, Total 1 hours 45 mins
- Flavor/Texture Hook: A satisfying chocolate shatter that gives way to a fudgy, melt in-your mouth interior.
- Perfect for: Valentine’s Day gifting, school treats, or a cozy date night activity.
- Create the Perfect Valentines Day Oreo Pops Recipe
- The Magic Behind This Sweet Valentine Treat
- Component Analysis of Classic Cookie Ingredients
- Essential Specifications for Your Cookie Masterpiece
- Step by Step Guide to Perfect Pops
- Common Pitfalls and Professional Kitchen Fixes
- Simple Substitutions for Every Dietary Need
- Maintaining Freshness and Reducing Kitchen Waste
- Designing a Stunning Color Balanced Dessert
- Recipe FAQs
- 📝 Recipe Card
Create the Perfect Valentines Day Oreo Pops Recipe
The air in my kitchen always changes when I start crushing cookies for these treats. There is this rhythmic, muffled thud of the rolling pin hitting the bag, followed by that deep, cocoa heavy aroma that instantly reminds me of Grandma's kitchen during the holidays.
She always insisted that the best treats involve a little bit of handiwork and a lot of heart. This Valentines Day Oreo Pops Recipe is exactly that - a labor of love that looks like it came from a high end boutique but feels like home.
I remember the first time I tried making these. I rushed the chilling process and ended up with "truffle soup" that wouldn't stay on the stick. It was a mess, honestly. But after years of tinkering with the ratios and the chocolate temperatures, I've found the secret rhythm.
It is about that specific moment when the cream cheese binds with the fine cookie dust to create something almost like edible clay. It is tactile, messy in the best way, and the results are consistently stunning.
We're going for a specific kind of magic here. It isn't just about mixing things together; it's about the contrast between the cold, dense center and the warm, fluid chocolate. When you dip that first pop and watch the excess silkily ribbon back into the bowl, you'll know exactly what I mean.
These aren't just snacks; they're tiny, hand held celebrations of chocolate and cream.
The Magic Behind This Sweet Valentine Treat
Success with this recipe relies on a few fundamental kitchen principles that ensure your pops don't fall apart or look dull.
- Lipid Emulsification: The fat in the softened cream cheese acts as a bridge between the dry cookie particles, creating a stable, scoopable dough that holds its shape under the weight of the chocolate.
- Crystallization Control: Adding a touch of refined coconut oil to the dark chocolate chips lowers the melting point and creates a thinner, more fluid coating that snaps beautifully when cold.
- Thermal Stability: Freezing the shaped balls before dipping ensures the stick stays anchored and the chocolate sets almost instantly upon contact, preventing unsightly drips.
| Method | Time | Texture | Best For |
|---|---|---|---|
| Food Processor | 2 minutes | Uniform, fudgy, and dense | Professional, smooth finish |
| Hand Crushed | 10 minutes | Chunky, rustic, and textured | A more "homemade" classic feel |
| Stand Mixer | 5 minutes | Medium crumb, very soft | Large batches for parties |
Using a food processor is my personal secret for that "bakery style" interior, but if you want that classic Grandma's kitchen vibe, don't be afraid to use a rolling pin and a bit of elbow grease. The hand crushed method gives a slightly different bite that many people actually prefer for its nostalgic texture.
Component Analysis of Classic Cookie Ingredients
| Ingredient | Science Role | Pro Secret |
|---|---|---|
| Oreo Cookies | Structural Base | Use standard Oreos (405g); Double Stuf has too much filling and makes the dough greasy. |
| Cream Cheese | Binding Agent | Use the brick variety (113g), not the spreadable tub version, for a firmer set. |
| Coconut Oil | Viscosity Modifier | Refined oil (15ml) keeps the chocolate glossy without adding a coconut flavor. |
| Vanilla Bean Paste | Flavor Depth | Paste (2.5ml) provides those gorgeous little flecks and a more intense aroma than extract. |
When selecting your cookies, stick to the classic 14.3 oz (405g) pack. I once tried using the thin version, and the ratio was completely off it ended up way too dry. The "stuffing" in the middle of a regular Oreo is actually part of the glue that holds the pop together.
For another classic treat that relies on great ingredient balance, you might want to check out my Bakery Red Velvet recipe which uses similar cream cheese notes.
Essential Specifications for Your Cookie Masterpiece
Before we start, gather these specific items to make the process smoother.
- 14.3 oz (405g) standard Oreo cookies
- 4 oz (113g) low-fat cream cheese, softened to room temperature
- 0.5 tsp (2.5ml) pure vanilla bean paste
- 0.125 tsp (0.75g) fine sea salt
- 10 oz (283g) high-quality dark chocolate chips (60% cacao)
- 1 tbsp (15ml) refined coconut oil
- 2 tbsp (10g) freeze dried strawberry powder
The Substitution Strategy
| Original Ingredient | Substitute | Why It Works |
|---|---|---|
| Standard Oreos | gluten-free Oreos | Same weight (405g). The texture is nearly identical once crushed. |
| Dark Chocolate | White Chocolate | Use 10 oz (283g). Note: Sweeter finish, requires more careful melting. |
| Strawberry Powder | Red Sanding Sugar | Adds crunch and color. Note: Lacks the tartness of fruit powder. |
If you're out of dark chocolate, high-quality milk chocolate works too, though I find the dark chocolate balances the sugar of the cookies much better. For a different vibe, these pops are quite similar to the base of my No Bake Rice Crispy recipe, which is another great shortcut dessert.
step-by-step Guide to Perfect Pops

Follow these steps closely, especially the chilling times. Patience is the most important ingredient here.
- Pulverize the cookies. Place the 14.3 oz (405g) Oreos in a food processor. Pulse until they reach a fine, sandy crumbs texture. Note: Large chunks will make your pops fall off the sticks later.
- Combine the base. In a large bowl, beat the 4 oz (113g) softened cream cheese, vanilla bean paste, and sea salt until smooth.
- Mix the dough. Fold the cookie crumbs into the cream cheese mixture. Use a sturdy spatula to press the crumbs into the cheese until no white streaks remain.
- Portion and roll. Scoop 18g portions (about 1 tablespoon) and roll into smooth spheres. Place them on a parchment lined tray.
- Initial chill. Refrigerate the balls for at least 30 minutes. They must feel firm to the touch before proceeding.
- Anchor the sticks. Melt 1 oz (28g) of the dark chocolate. Dip the tip of each cake pop stick into the chocolate, then insert it halfway into a chilled cookie ball.
- Flash freeze. Place the anchored pops in the freezer for 15 minutes. This locks the stick in place like concrete.
- Prepare the coating. Melt the remaining 9 oz (255g) dark chocolate chips with 1 tbsp (15ml) coconut oil in 30 second intervals. Stir until velvety and completely liquid.
- The velvet dip. Submerge a chilled pop into the chocolate, lift straight up, and gently tap your wrist to remove excess. The coating should look smooth and thin.
- The finishing flourish. While the chocolate is still wet, dust with the freeze dried strawberry powder. The powder will adhere as the chocolate sets.
Chef's Note: If the chocolate starts to thicken, pop it back in the microwave for 10 seconds. Cold pops will cool down your dipping chocolate surprisingly fast!
Common Pitfalls and Professional Kitchen Fixes
Why Your Pops Fall Off The Stick
This usually happens because the centers are too warm or the chocolate anchor wasn't set. If the cookie dough is too soft, the weight of the chocolate coating will simply pull the ball right off the stick during the dip. Always ensure that 15 minute freezer set after inserting the sticks.
Managing Chocolate Cracking
If your chocolate shell cracks after setting, it's usually due to an extreme temperature shock. If the cookie balls are "ice cold" from the freezer and the chocolate is "piping hot," the rapid expansion and contraction will cause the shell to shatter. Aim for "firm cold" balls and "warm not-hot" chocolate.
| Problem | Root Cause | Solution |
|---|---|---|
| Lumpy Coating | Overheated chocolate | Melt in shorter bursts; add a teaspoon of coconut oil to thin it out. |
| Flat Bottoms | Setting on parchment | Stand the pops upright in a styrofoam block or a box with holes while drying. |
| Greasy Texture | Too much cream cheese | Add more crushed cookies or chill longer to firm up the fats. |
Common Mistakes Checklist:
- ✓ Use standard Oreos, never Double Stuf (prevents oily centers).
- ✓ Soften cream cheese completely before mixing (prevents white lumps).
- ✓ Dip the stick in chocolate before inserting (creates a "glue" bond).
- ✓ Don't stir the dipping chocolate too vigorously (prevents air bubbles).
- ✓ Tap your wrist, not the stick, to remove excess chocolate (prevents the ball from falling off).
Simple Substitutions for Every Dietary Need
Scaling this recipe is quite straightforward as long as you keep the ratio of 3.5 parts cookie to 1 part cream cheese.
- To make a smaller batch (9 servings): Use 7 oz (200g) of cookies and 2 oz (56g) of cream cheese. You can beat one egg yolk and use half if you were making a baked version, but since this is no bake, just halve the weights!
- To make a party batch (36 servings): Double the cookies and cream cheese, but only increase the salt and vanilla to 1.5x the original amount. Work in batches when dipping to keep your chocolate temperature consistent.
- Baking adjustment: If you decide to use this filling inside a cupcake, reduce the cream cheese by 20% to ensure it doesn't leak out during the bake.
If you are looking for a more vibrant pink option for a larger crowd, my Valentines Day Pink recipe is a fantastic companion to these pops.
Decision Shortcut: If you want a sharper snap, use chocolate bars chopped finely instead of chips. If you want a sweeter treat, swap the dark chocolate for white chocolate and omit the sea salt.
If you want a fruitier finish, mix 1 tsp of the strawberry powder directly into the cookie dough.
Maintaining Freshness and Reducing Kitchen Waste
Grandma never wasted a crumb, and neither should we! The leftover chocolate in your dipping bowl is liquid gold.
Storage Guidelines: Store these in an airtight container in the fridge for up to 7 days. If you've used sticks, standing them up is best, but you can also lay them flat between layers of parchment paper.
They can be frozen for up to 2 months; just be aware that the chocolate might "bloom" (get a white dusty look) from the moisture, though it still tastes perfectly fine.
Zero Waste Tips: Don't toss the leftover melted chocolate! Stir in any remaining cookie crumbs or some pretzels to make a quick "kitchen sink" bark. If you have extra strawberry powder, it's a beautiful addition to your morning yogurt or a Valentines Day Chocolate recipe for an extra tart kick. Even the broken cookie bits from the bottom of the bag are perfect for topping a bowl of vanilla ice cream.
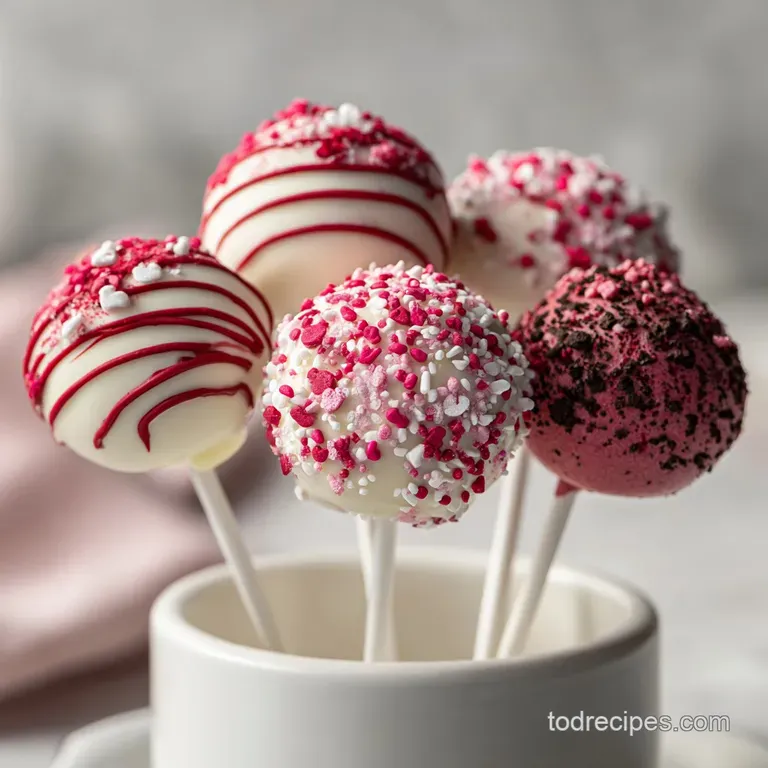
Designing a Stunning Color Balanced Dessert
For Valentine's Day, we want a palette that feels romantic and sophisticated. I like to focus on three distinct color accents that make these pops look professionally designed.
- Obsidian Black: This is your base. The dark chocolate coating (60% cacao) provides a deep, moody background that makes other colors pop.
- Ruby Red: The freeze dried strawberry powder adds a vibrant, natural red. Add this immediately after dipping while the chocolate is still "tacky."
- Creamy Ivory: A very thin drizzle of white chocolate or a few white nonpareils adds a bright contrast. Add this only after the dark chocolate has fully set to keep the lines clean and crisp.
When you arrange these on a platter, try to vary the heights. Use a tall glass filled with sugar or dried beans to stand some up, and lay others on a bed of tissue paper. This visual variety makes the "treats" feel more like a curated collection.
Trust me, when people see that velvety interior against the sharp snap of the dark shell, they won't believe you made them in your own kitchen!
- Mass
- Each ball should weigh exactly 18g for uniform dipping.
- Temp
- Melt chocolate to no more than 115°F (45°C) to avoid seizing.
- Time
- Allow exactly 30 minutes for the final set in the fridge before serving.
Kitchen Myths to Ignore
"You must use a double boiler for the chocolate." Honestly, the microwave is perfectly fine if you go slow. 30 second bursts and frequent stirring prevent the chocolate from burning. Another myth is that you need "special" dipping chocolate.
high-quality chips with a tablespoon of coconut oil work just as well as expensive couverture chocolate for home cooks!

Recipe FAQs
Is it true that the cookie ball centers must be completely frozen before dipping?
No, they should be firmly chilled, not rock hard frozen. The balls need to be firm (after 30 minutes chilling) so they hold their shape, but completely frozen centers can cause the exterior chocolate shell to crack upon warming slightly.
How to prevent the chocolate coating from looking dull or developing a white film (bloom)?
Avoid overheating the chocolate and minimize stirring speed. Overheating causes cocoa butter crystals to separate, leading to bloom; use refined coconut oil to keep the coating fluid and glossy.
How to attach the lollipop stick securely so the pop doesn't fall off?
Dip the tip of the stick into a small amount of melted chocolate before insertion. Chill the coated balls in the freezer for 15 minutes after inserting the stick to let this chocolate anchor set completely.
Can I substitute standard cream cheese with whipped or tub-style cream cheese?
No, stick to the firm block variety, preferably low-fat. Whipped cream cheese contains too much air and liquid, resulting in a soft, unstable truffle that crumbles under the weight of the chocolate shell.
How to achieve a very thin, professional looking chocolate shell that snaps cleanly?
Thin the melted chocolate significantly using refined coconut oil. If you enjoyed mastering the viscosity control here, see how the same principle works when tempering for shine in our Buttered Pecan Ice recipe.
What is the best way to crush the Oreos for the filling?
Use a food processor for a fine, sandy crumb texture. If you prefer a more rustic feel, place them in a zip-top bag and crush them using a rolling pin until the chunks are uniform.
How long can these Oreo Pops be stored before serving for a party?
They can be stored in an airtight container in the refrigerator for up to 7 days. For longer storage, freeze them, but be aware that the chocolate coating might develop a slight cosmetic bloom upon thawing.
Valentines Day Oreo Pops

Ingredients:
Instructions:
Nutrition Facts:
| Calories | 213 kcal |
|---|---|
| Protein | 2.4 g |
| Fat | 11.8 g |
| Carbs | 25.6 g |
| Fiber | 1.4 g |
| Sugar | 15.4 g |
| Sodium | 139 mg |
