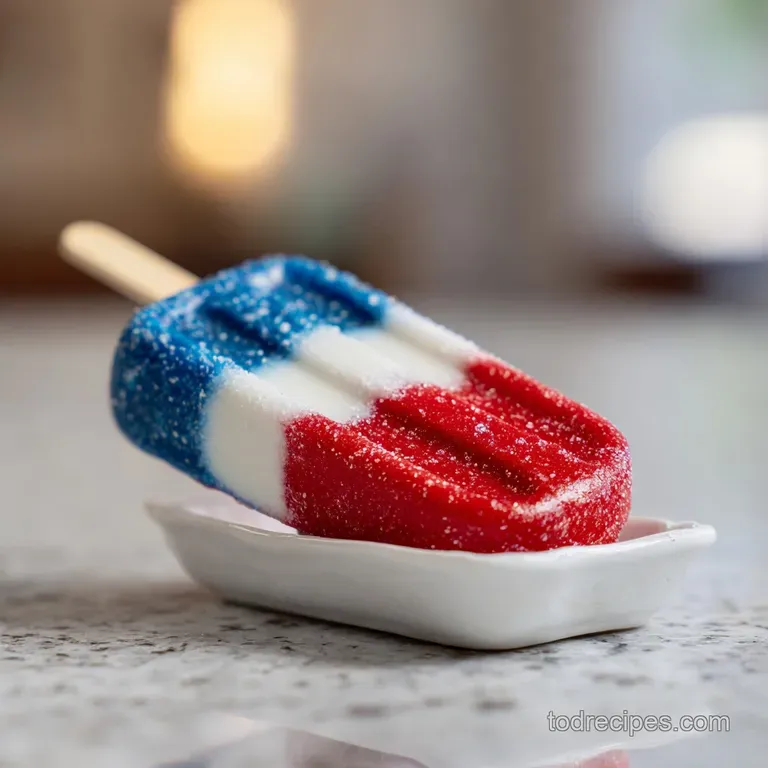
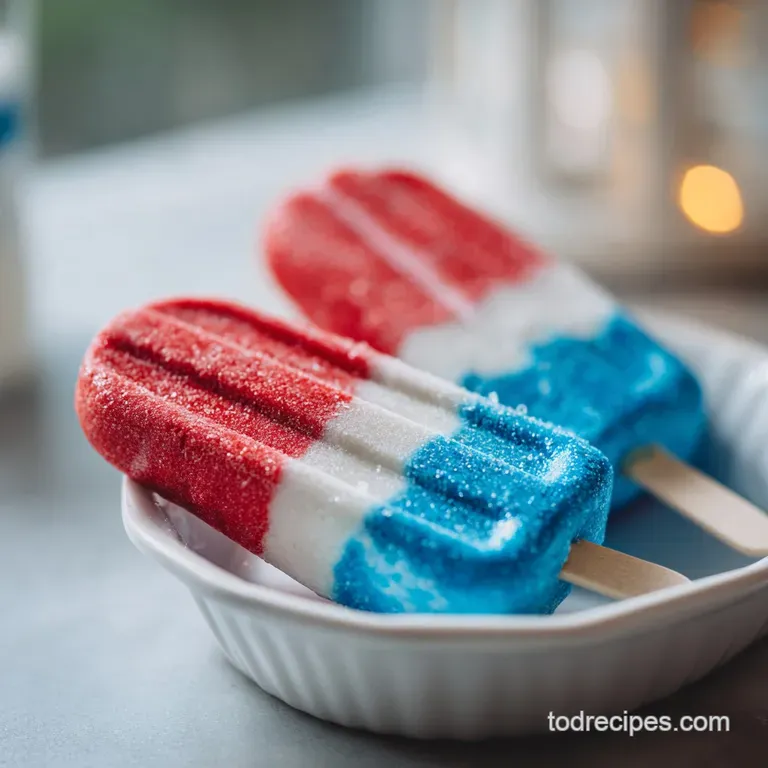
Red White and Blue Bomb Pop Cookies
- Time: Active 45 minutes, Passive 12 minutes, Total 57 minutes
- Flavor/Texture Hook: Buttery, tender crumb with a nostalgic almond vanilla "birthday cake" finish and a sugary crunch.
- Perfect for: 4th of July celebrations, summer block parties, or kid friendly backyard BBQs.
- Mastering My Favorite Bomb Pop Cookies
- The Secret to No Spread Layers
- Efficient Planning for Baking Success
- Essential Patriotic Sugar Cookie Ingredients
- Gear for Perfectly Shaped Treats
- Layering and Baking Your Treats
- Solving Common Dough Baking Hurdles
- Creative Summer Cookie Flavor Variations
- Debunking Sugar Cookie Myths
- Storing and Reheating Your Treats
- Complementary Sides for Summer Parties
- Recipe FAQs
- 📝 Recipe Card
Mastering My Favorite Bomb Pop Cookies
You don't need a professional bakery setup or expensive silicone molds to recreate that iconic ice cream truck vibe in cookie form. Most people assume these tricolor treats require complicated piping or messy royal icing, but the secret actually lies in a simple "laminate and slice" method that anyone can pull off.
Forget everything you know about fussy, crumbly sugar cookies that spread into shapeless blobs in the oven; we’re using a high density dough designed to stay exactly where you put it.
I remember the first time I tried making these for a neighborhood cookout. I thought I could just swirl the colors together like a marble cake, but they ended up looking more like a tie dye accident than a patriotic snack.
The real revelation came when I realized that treating the dough like a stack of plywood layering precise sheets of red, white, and blue was the only way to get those crisp, clean lines that make people ask, "Wait, you actually made these?"
This recipe delivers a cookie that has a distinct, velvety snap when you bite into it, followed by a tender interior that doesn't feel like a dry biscuit. We are leaning heavily into the classic "blue raspberry and cherry" flavor profile by using a hint of almond extract, which magically mimics that specific nostalgic aroma of a melting rocket pop on a hot July afternoon.
It's a fun, structural bake that proves you can play with your food and still end up with something sophisticated.
The Secret to No Spread Layers
Emulsion Stability: Using a room temperature egg ensures the 10.7g of fat per serving stays suspended in the 225g of butter, creating a sturdy structural web that prevents the cookies from collapsing or thinning out.
Cold Fat Suspension: When the chilled dough hits the 350°F (180°C) oven, the cold butter creates tiny steam pockets that lift the 360g of sifted flour just enough to be tender without losing the defined rocket edges.
Pigment Concentration: Gel food coloring provides the deep red and royal blue hues without introducing excess water, which would otherwise steam the dough from the inside and cause unwanted spreading or "bubbling."
| Cooking Method | Active Time | Resulting Texture | Best For |
|---|---|---|---|
| Traditional Oven | 12 minutes | Crisp edges with a soft, uniform center | Party ready cookies with clean lines |
| Stovetop Skillet | 15 minutes | Dense, chewy, and slightly browned bottom | A single, giant sharing "pizza" cookie |
Cooking these in the oven is my go to because it allows the heat to circulate evenly around the layers, ensuring the red doesn't bake faster than the blue. While a stovetop skillet cookie is fun for a "rustic" look, you lose that iconic rocket pop silhouette that makes these so recognizable at first glance.
| Key Ingredient | Structural Role | Chef's Secret |
|---|---|---|
| 360g AP Flour | Provides the gluten framework to hold the popsicle stick | Always sift the flour to prevent "tunnels" or air pockets in the rocket layers |
| 225g Unsalted Butter | Delivers the "velvety" mouthfeel and carries the vanilla aroma | Use high-quality European style butter for a lower water content and better shape retention |
| 0.5 tsp Almond Extract | Creates the nostalgic "blue raspberry" scent association | A tiny drop extra makes the cookies smell exactly like the ice cream truck original |
Efficient Planning for Baking Success
Timing is everything when you're working with layered doughs. If the dough gets too warm while you're stacking the red, white, and blue sections, the layers will slide around like they're on a slip and slide. You want the dough to feel like firm modeling clay, not sticky paste.
I've found that the 45 minutes of prep time is best split into three distinct "chills": ten minutes after mixing, ten minutes after layering, and a final five minute flash chill once the sticks are inserted.
When you're sifting your 360g of all purpose flour, don't just shake the sieve; use a spoon to push it through. This tiny bit of extra effort ensures the 0.5 tsp of sea salt is perfectly distributed. There’s nothing worse than a "salt bomb" in a sweet cookie. For those who love a dense, bakery style texture with a bit more chew, you might also enjoy the consistency of these Utah Pink Sugar Cookies which use a similar high fat ratio.
Chilling the Dough Twice
Temperature control is your best friend here. After kneading the red and blue gel colors into their respective portions, the friction from your hands will naturally warm up the butter. If you try to stack them immediately, the colors might bleed at the edges.
Give each color a ten minute rest in the fridge before you roll them out into the tricolor stack.
Gel Versus Liquid Coloring
Always reach for the gel. Liquid food coloring is mostly water, and adding a teaspoon of water to a dough that only has 1 large egg for moisture will completely ruin the hydration balance. Gel coloring gives you that "vibrant" red and blue without turning your dough into a sticky mess that clings to your rolling pin.
Securing the Popsicle Stick
The 18 wooden popsicle sticks need to be anchored deeply into the blue and white sections. If you only push them in an inch, the weight of the red "top" will cause the cookie to snap off the stick as soon as someone picks it up.
Aim to have the stick reach at least halfway through the entire cookie length for maximum stability.
Essential Patriotic Sugar Cookie Ingredients
- 225g unsalted butter, softened: This is the heart of the cookie. Use butter that yields slightly to a thumbprint but isn't greasy. Why this? Softened butter creams faster without incorporating too much air, preventing "puffing."
- 200g granulated white sugar: Provides sweetness and crisp edges. Why this? Fine crystals dissolve quickly into the butter for a smoother dough texture.
- 1 large egg, room temperature: Acts as the binder for the 360g of flour. Why this? Room temp eggs won't seize the butter, keeping the emulsion silky.
- 2 tsp pure vanilla extract: The base flavor for the white section.
- 0.5 tsp almond extract: This is the "secret" ingredient for that authentic Bomb Pop smell.
- 360g all purpose flour, sifted: The structural foundation.
- 0.5 tsp fine sea salt: Balances the 200g of sugar and enhances the butter.
- 1 tsp deep red gel food coloring: Specifically look for "No Taste Red" to avoid bitterness.
- 1 tsp royal blue gel food coloring: Provides that deep, oceanic blue.
- 18 wooden popsicle sticks: Standard craft size works perfectly.
- 1 tbsp sparkling white sanding sugar: Adds the "icy" crunch to the finished cookie.
| Original Ingredient | Substitute | Why It Works |
|---|---|---|
| 225g Unsalted Butter | Vegan Butter Sticks (1:1) | High fat vegan sticks maintain the "no spread" quality. Note: May brown faster. |
| 200g White Sugar | Coconut Sugar (180g) | Adds a toasted caramel note. Note: Will darken the "white" layer to tan. |
| 0.5 tsp Almond Extract | Lemon Zest (1 tbsp) | Provides a fresh, citrusy pop. Note: Changes the classic nostalgia profile. |
If you're worried about the dough being too sweet, the sea salt is your lever. I always use a "level" half teaspoon, but if you're using salted butter by mistake, omit the extra sea salt entirely. For a version that leans into deeper, more autumnal notes, check out how the molasses affects the crumb in my Giant Molasses Cookies.
Gear for Perfectly Shaped Treats
You don't need a gadget drawer full of specialized equipment, but a stand mixer such as a KitchenAid makes the creaming process much more consistent. Using the paddle attachment is non negotiable; a whisk attachment will whip in too much air, creating a cake like cookie that won't hold the weight of the popsicle stick.
A sharp chef's knife or a bench scraper is also essential. When you're slicing the tricolor dough log, you want a "clean" cut. If your knife is dull, you'll squish the layers together, and your red, white, and blue will look like a muddy smudge.
I also recommend using a heavy duty baking sheet (like a Nordic Ware half sheet) to prevent the bottoms from scorching before the centers are set.
Chef's Tip: Freeze your wooden popsicle sticks for 10 minutes before inserting them into the dough. The cold wood helps the surrounding butter firm up instantly, locking the stick in place like a microscopic anchor.
Layering and Baking Your Treats
- Cream the 225g of softened butter and 200g of granulated sugar in your stand mixer on medium speed for 3 minutes until a velvety paste forms.
- Add the room temperature egg, 2 tsp vanilla, and 0.5 tsp almond extract, mixing until the liquid is fully absorbed.
- Turn the mixer to low and slowly add the 360g of sifted flour and 0.5 tsp salt until the dough pulls away from the bowl.
- Divide the dough into three equal parts (roughly 260g each); leave one plain, and knead the red and blue gels into the others until the color is uniform.
- Roll each color into a rectangular sheet about 1/2 inch thick and stack them: blue on bottom, white in middle, red on top.
- Press the layers together firmly and trim the edges with a sharp knife to reveal the clean tricolor stripes.
- Cut the stack into 18 vertical bars, then gently taper the red end with your fingers to create the classic rocket pop shape.
- Carefully slide a wooden popsicle stick into the blue end, pushing it until it is halfway through the white layer.
- Sprinkle the 1 tbsp of sanding sugar over the cookies and chill the tray for 15 minutes to ensure they don't spread.
- Bake at 350°F (180°C) for 12 minutes until the edges are just barely set and matte.
Create No Spread Base
The first step is the most critical. If you over cream the butter and sugar until it's light and fluffy, you're essentially injecting air bubbles that will expand in the oven. We want a "velvety paste" consistency.
This keeps the density high, which is the only way a cookie can support a wooden stick without shattering when you lift it.
Shaping the Rocket Cookies
Once you have your tricolor bars, don't just leave them as rectangles. Take a second to pinch the "red" top slightly. This creates that iconic aerodynamic look of a Bomb Pop. It’s a small detail, but it’s the difference between a "striped cookie" and a "rocket pop cookie."
Solving Common Dough Baking Hurdles
Sometimes the dough just doesn't cooperate, especially if your kitchen is hot. If you find the dough is "tearing" as you roll it, it's likely too cold. Let it sit on the counter for 5 minutes. Conversely, if it’s sticking to your hands, it’s too warm.
Dust your palms with a tiny bit of extra flour but be careful, too much flour will make the finished product taste like cardboard.
The most common heartbreak is the "Leaning Tower of Cookie" where the rocket falls off the stick. This usually happens because the stick wasn't pushed in far enough or the dough was too warm when it went into the oven. Chilling the entire tray right before baking is the ultimate insurance policy.
Why Your Cookies Spread Too Much
If your rockets look like puddles, the butter was likely too melted before it hit the oven. Another culprit is using liquid food coloring instead of gel, which thins out the dough.
Check your oven temperature with a thermometer; many home ovens run 25 degrees hot, which causes the butter to melt before the flour structure can set.
| Problem | Root Cause | Solution |
|---|---|---|
| Muddy Colors | Over handling the dough layers | Chill dough for 10 mins before stacking and use a sharp knife for clean cuts. |
| Wobbly Stick | Stick not inserted deep enough | Push stick at least 2 inches into the dough log; flash freeze for 5 mins before baking. |
| Crumbly Texture | Too much flour or over mixing | Measure flour by weight (360g) and stop mixing as soon as the dough clears the bowl sides. |
Common Mistakes Checklist:
- ✓ Never skip the sifting step for the 360g of flour (prevents lumpy rockets).
- ✓ Ensure the egg is truly room temperature (prevents the "curdling" of the butter).
- ✓ Use a "sawing" motion with a sharp knife when cutting the layers (prevents smearing).
- ✓ Preheat the oven for at least 20 minutes (ensures the "shatter" snap texture).
- ✓ Let cookies cool completely on the pan (they finish setting their structure as they cool).
Creative Summer Cookie Flavor Variations
If you want to move away from the traditional almond/vanilla profile, you can easily swap the extracts. A "Triple Citrus" version is fantastic: use 1 tsp of lemon extract in the yellow/white layer, lime in the green, and orange in the red. It’s bright, refreshing, and feels like a gourmet popsicle.
For a more decadent "Midnight Rocket," you could use cocoa powder in the "blue" layer (it will turn dark, but looks cool) and peppermint extract in the white. This creates a flavor profile similar to those fancy artisan ice cream pops. If you're looking for something that uses a completely different fat profile, my Lemon Coconut Cheesecake Cookies offer a tangier alternative for summer parties.
gluten-free Flour Options
You can make these gluten-free by swapping the 360g of AP flour for a high-quality 1:1 gluten-free baking blend (like King Arthur or Cup4Cup). Because GF flour lacks the elastic proteins of wheat, you may need to add 1/4 tsp of xanthan gum if your blend doesn't include it.
This ensures the cookie doesn't crumble off the stick.
Freezing the Cookie Dough
This dough freezes beautifully. You can make the tricolor log, wrap it in three layers of plastic wrap, and freeze it for up to 3 months. When you're ready to bake, let it thaw in the fridge for 2 hours before slicing and inserting the sticks. It’s a huge time saver for busy holiday weekends.
Debunking Sugar Cookie Myths
"You must use cold butter for sugar cookies." This is a myth for this specific style of cookie. While cold butter is great for flaky pie crusts, softened butter (room temp) is essential for a "velvety" sugar cookie dough that can be easily colored and layered.
If you start with cold butter, you'll end up with "streaks" of fat that cause the colors to look blotchy.
"Sanding sugar is just for decoration." Actually, the 1 tbsp of sanding sugar provides a structural "crunch" that mimics the icy crystals of a real Bomb Pop. It changes the sensory experience from a simple soft bake to something that actually feels like a frozen treat in your mouth.
Storing and Reheating Your Treats
These cookies stay fresh in an airtight container at room temperature for up to 5 days. If you're in a high humidity area, the sugar can get a bit soft; in that case, stick a piece of white bread in the container to absorb excess moisture.
For longer storage, freeze the baked cookies (without the sticks if possible, or very carefully) for up to 2 months.
To use up any tricolor scraps from trimming the edges, don't throw them away! Roll them together into "Galaxy Marbled" cookies. They won't have the rocket shape, but they taste exactly the same and look like a nebula. It’s a great zero waste trick that kids absolutely love.
Complementary Sides for Summer Parties
Since these cookies are quite sweet and nostalgic, they pair beautifully with tart or salty snacks. I love serving them alongside a big bowl of fresh watermelon wedges or a salty pretzel mix. The contrast between the buttery 210 calorie cookie and a refreshing fruit salad is the peak of summer dining.
If you’re hosting a full 4th of July spread, these are the perfect "grab and-go" dessert because they don't require plates or forks. Just stack them in a tall glass jar (sticks up!) so guests can help themselves. They also look stunning alongside a Pink Strawberry Cheesecake Cookie for a full tricolor dessert table that hits all the berry notes.

Recipe FAQs
How to ensure the dough gets the perfect, cohesive texture?
Mix the flour and sea salt slowly into the butter mixture until the dough pulls away from the bowl's sides. Avoiding over aeration during the initial creaming phase ensures the final dough remains dense and easy to shape.
Is it necessary to use a stand mixer for this recipe?
Yes, a stand mixer is highly recommended for the best results. Using the paddle attachment on medium speed ensures the butter and sugar form a perfectly velvety paste, which is difficult to replicate by hand.
Is it true I should use liquid food coloring for more vibrant layers?
No, this is a common misconception. You must use gel food coloring to achieve vibrant, streak free results without altering the dough's consistency with excess liquid.
How to keep the cookies fresh if I live in a humid environment?
Place a piece of white bread in your airtight storage container. This acts as a desiccant, absorbing excess moisture to prevent the sparkling sugar from softening over the 5-day shelf life.
Can I freeze the cookies after they are baked?
Yes, you can freeze them for up to 2 months. For the best results, remove the wooden popsicle sticks before freezing to prevent breakage, or handle them with extreme care when stacking.
How to handle the dough scraps left over from shaping?
Roll the tricolor scraps together to create marbled cookies. While they will lack the standard rocket shape, the flavor profile remains identical to the original batch.
Does the egg need to be at a specific temperature before mixing?
Yes, the egg must be at room temperature. Using a room temperature egg ensures it incorporates seamlessly into the butter and sugar mixture without causing the fats to clump.
Red White Blue Bomb Pop Cookies
Ingredients:
Instructions:
Nutrition Facts:
| Calories | 210 calories |
|---|---|
| Protein | 2.4 g |
| Fat | 10.7 g |
| Carbs | 26.8 g |
| Fiber | 0.5 g |
| Sugar | 11.3 g |
| Sodium | 68 mg |
