Chocolate Sheet Cake: Fudgy and Tender
- Time: Active 15 minutes, Passive 20 minutes, Total 35 minutes
- Flavor/Texture Hook: Fudgy, tender crumb with a crackly, buttery chocolate pecan glaze
- Perfect for: Large family gatherings, church potlucks, and beginner bakers
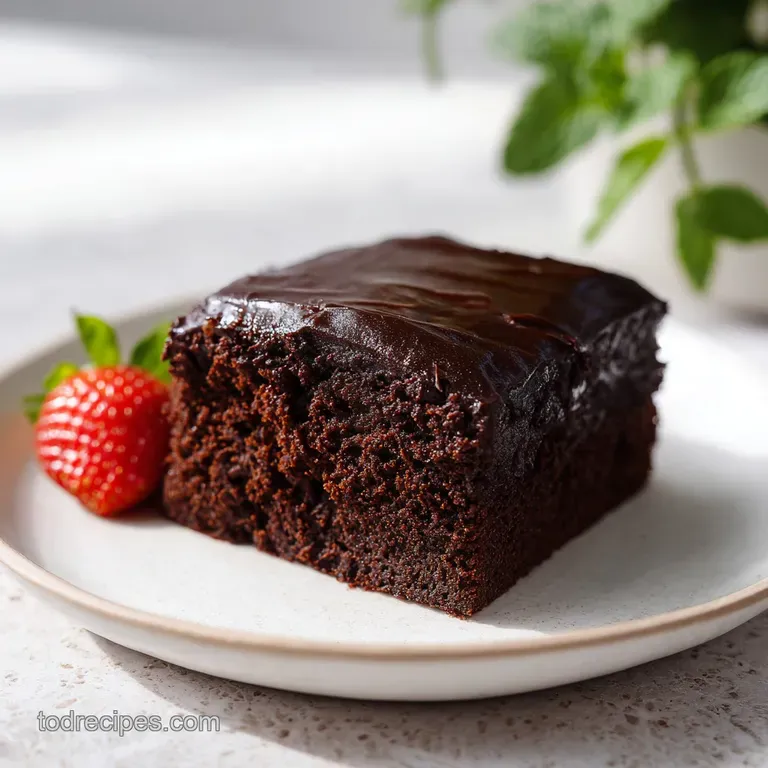
- Potluck Dessert to Feed a Crowd with Chocolate Sheet Cake
- Why This Hot Glaze Works
- Essential Specs and Precision Timing
- Building Blocks of Fudgy Flavor
- Minimal Tools for Perfect Cakes
- Bringing Your Sheet Cake Together
- Fixes for Common Baking Hiccups
- Simple Swaps and Creative Twists
- Proper Storage and Zero Waste
- Presentation Tips for Beautiful Slices
- Sheet Cake Myths
- Recipe FAQs
- 📝 Recipe Card
Potluck Dessert to Feed a Crowd with Chocolate Sheet Cake
The smell of cocoa hitting boiling water is better than any candle you could buy. It’s that deep, earthy scent that makes your mouth water before the oven is even preheated. I remember the first time I saw my grandma making this; she didn't use a fancy stand mixer or any complicated gadgets.
She just had a sturdy saucepan and a wooden spoon that had seen better days, yet she produced the most decadent, crowd pleasing dessert I’d ever tasted. Discover the ultimate chocolate sheet cake recipe, perfect for any potluck!
When you’re tasked with bringing a dessert to a big gathering, the pressure is real. You want something that looks impressive but doesn't require individual plating or fussy decorations. This sheet cake is the answer.
It’s essentially a giant brownie cake hybrid that feeds forty people without breaking a sweat. The magic happens when you pour that warm, shimmering glaze over the cake while it's still hot from the oven. It seeps into the top layer, creating a texture that is impossibly moist and rich.
We’ve all been there bringing a beautiful cake to a party only to have it dry out or crumble under the weight of the frosting. This recipe is different. Because of the buttermilk and the specific way we handle the fats, this cake stays tender for days.
It’s a reliable classic that has stood the test of time for a reason. You won't need to worry about high altitude adjustments or temperamental egg whites here. Just simple, honest ingredients coming together to make people happy.
Why This Hot Glaze Works
Blooming Cocoa: Boiling the water, butter, and cocoa powder together "blooms" the chocolate, releasing oils and flavors that would otherwise stay trapped in the dry powder. This results in a much more intense chocolate profile without needing expensive gourmet bars.
Acidic Tenderization: The buttermilk acts as a natural tenderizer by breaking down long gluten strands, which ensures the cake has a "short" and velvety crumb rather than a bread like texture.
It also reacts with the baking soda to provide a gentle, even rise across the large surface area of the sheet pan.
Hot on-Hot Saturation: Pouring boiling glaze onto a hot cake allows the liquid frosting to penetrate the upper crust of the sponge. As the cake cools, it locks that moisture in, creating a fudgy interface between the cake and the frosting that prevents the dessert from ever tasting dry.
Fat Distribution: Using melted butter instead of creamed butter ensures a denser, more moist crumb that mimics the texture of a high end brownie. This makes the cake sturdy enough to be eaten by hand at a picnic but soft enough to feel like a premium dessert.
| Servings | Pan Size | Ingredient Adjustment | Visual Cue |
|---|---|---|---|
| 10 People | 9x9 inch square | Half all ingredients | Thick batter, 2 inch height |
| 20 People | 9x13 inch rectangle | 3/4 all ingredients | Medium batter, 1.5 inch height |
| 40 People | 18x13 inch rimmed | Full recipe | Thin batter, 1 inch height |
Choosing the right pan is half the battle when preparing a dessert for a large group. For this specific recipe, we use a standard half sheet pan (18x13 inches). This ensures the cake is the perfect thickness not too thin like a cracker, but not so thick that the middle stays gooey while the edges burn.
If you use a smaller pan, you'll need to increase the bake time significantly, which risks drying out the edges. Stick to the rimmed sheet pan for that classic, uniform look that makes slicing a breeze.
Essential Specs and Precision Timing
When we talk about "precision" in home baking, it doesn't mean you need a lab coat. It just means following a few key checkpoints to ensure success. For this cake, the temperature of your ingredients matters just as much as the heat of your oven.
If your buttermilk and eggs are ice cold from the fridge, they can "shock" the warm cocoa mixture, causing the butter to clump and the batter to break. Take them out about 30 minutes before you start.
| Ingredient | Science Role | Pro Secret |
|---|---|---|
| Unsweetened Cocoa | Flavor Base | Bloom in boiling liquid to unlock deep aromatic compounds. |
| Buttermilk | Texture & Rise | Provides acidity to activate baking soda for a tender, soft crumb. |
| Boiling Water | Hydration | Fully dissolves sugar and cocoa for a perfectly smooth, silk like batter. |
| Pecans | Texture Contrast | Toast them for 5 minutes before adding to the glaze for extra crunch. |
The interaction between the boiling water and the flour is also a critical moment. By adding hot liquid to the dry ingredients, you are partially gelatinizing the starches in the flour. This is a trick often used in traditional baking to create a cake that holds more moisture. It’s why this cake stays fresh longer than a standard sponge cake. If you're looking for other crowd favorites, you might also enjoy a fudgy dessert that uses similar chocolate principles for a different presentation.
Building Blocks of Fudgy Flavor
For the cake base, you'll need the basics: 2 cups of all purpose flour, 2 cups of granulated sugar, 1 teaspoon of baking soda, and 1/2 teaspoon of salt. These form the structure and sweetness.
The real character comes from the wet team: 1 cup of unsalted butter, 1 cup of water, and 1/4 cup of unsweetened natural cocoa powder. We’ll finish the batter with 1/2 cup of room temperature buttermilk, 2 large eggs, and 1 teaspoon of pure vanilla extract.
For the warm fudge glaze, we keep the momentum going with another 1/2 cup of unsalted butter, 1/4 cup of cocoa powder, and 6 tablespoons of whole milk. The sweetness comes from 3 cups of sifted powdered sugar, with a teaspoon of vanilla and 1 cup of chopped pecans for that classic crunch.
Don't skip sifting the powdered sugar; it's the difference between a sleek, professional glaze and one with white lumps.
For the Cake Base
- All purpose flour: The structural foundation. Why this? Provides enough protein for structure without making the cake tough or bread like. (Sub: gluten-free 1:1 blend)
- Granulated sugar: Sweetness and moisture. Why this? Dissolves easily in the hot batter for a uniform, soft texture. (Sub: Light brown sugar for more caramel notes)
- Unsalted butter: The primary fat source. Why this? Allows you to control the salt content while providing a rich, creamy mouthfeel. (Sub: Salted butter, but omit the extra 1/2 tsp salt)
- Natural cocoa powder: The chocolate heart. Why this? Natural cocoa is more acidic, which reacts better with baking soda for a good rise. (Sub: Dutch processed cocoa for a darker, milder flavor)
- Buttermilk: The tenderizing agent. Why this? The acidity ensures a fine crumb and keeps the cake moist for days. (Sub: 1/2 cup milk + 1/2 tbsp lemon juice)
For the Warm Fudge Glaze
- Powdered sugar: The glaze thickener. Why this? Dissolves instantly into the hot butter and milk for a smooth finish. (Sub: None recommended for this specific texture)
- Whole milk: The liquid binder. Why this? Adds a hint of dairy richness that water can't provide. (Sub: Heavy cream for a thicker, richer ganache style frosting)
- Chopped pecans: The textural highlight. Why this? Provides a necessary crunch to offset the soft cake and silky glaze. (Sub: Toasted walnuts or omit for nut allergies)
Minimal Tools for Perfect Cakes
One of the reasons this is my favorite recipe for a busy weeknight or a hectic Saturday morning is that it requires almost no cleanup. You don't need to drag out the heavy stand mixer. In fact, over mixing this batter with a machine can actually make the cake tough by developing too much gluten.
A simple large mixing bowl, a whisk, and a medium saucepan are all you need.
You'll also want a reliable 18x13 inch rimmed sheet pan. This is often called a "half sheet" pan in professional kitchens. Make sure it has a rim at least one inch high to prevent the batter from overflowing. Since we are pouring a liquid glaze over the top, that rim is essential for keeping the frosting on the cake rather than on your oven floor. If you're planning a full spread, this cake pairs beautifully with something lighter, like an Ina Garten Coconut Cake for guests who want a variety of flavors.
Bringing Your Sheet Cake Together
- Preheat your oven to 400°F (200°C) and generously grease an 18x13 inch rimmed sheet pan with butter or non stick spray.
- In a large mixing bowl, whisk together 2 cups flour, 2 cups sugar, 1 tsp baking soda, and 1/2 tsp salt until no large lumps remain. Note: Whisking dry ingredients first aerates the flour for a lighter cake.
- Combine 1 cup butter, 1 cup water, and 1/4 cup cocoa powder in a saucepan over medium heat.
- Bring the mixture to a rolling boil until the butter is completely melted and the liquid is glossy.
- Pour the boiling chocolate mixture over the dry ingredients and stir with a whisk until just combined.
- Whisk in 1/2 cup buttermilk, 2 large eggs, and 1 tsp vanilla until the batter is smooth and liquidy.
- Pour the batter into your prepared pan and bake for 18–22 minutes until a toothpick comes out clean and the center springs back.
- Five minutes before the timer goes off, combine 1/2 cup butter, 1/4 cup cocoa, and 6 tbsp milk in a clean saucepan and bring to a boil.
- Remove from heat and immediately whisk in 3 cups powdered sugar, 1 tsp vanilla, and 1 cup pecans until the glaze is thick but pourable.
- Pour the hot frosting over the cake immediately after it comes out of the oven, spreading gently to the edges.
- Let the cake set for at least 20 minutes until the glaze develops a thin, crackly crust.
Fixes for Common Baking Hiccups
Fixing Dry Cake Crumb
If your cake feels more like a biscuit than a fudgy delight, you likely overbaked it. Because sheet cakes are so thin, even two extra minutes in the oven can zap the moisture. Next time, start checking at the 18 minute mark.
If it's already dry, you can save it by poking small holes across the surface with a fork before pouring the glaze; this allows the warm frosting to soak deeper into the sponge.
Smoothing Gritty Chocolate Glaze
A grainy frosting usually happens if the powdered sugar wasn't sifted or if the butter and milk mixture cooled too much before the sugar was added. The sugar needs that heat to dissolve properly. If you see lumps, don't panic. Put the saucepan back over very low heat and whisk vigorously for sixty seconds.
The gentle heat will help the sugar crystals break down without scorching the chocolate.
| Problem | Root Cause | Solution |
|---|---|---|
| Cake Sinking | Oven door opened too early | Don't peek before 15 minutes have passed. |
| Bubbles on Top | Over whisking the eggs | Stir eggs in gently; don't whip air into them. |
| Glaze Sliding Off | Cake cooled too much | Pour while both cake and glaze are steaming hot. |
Chef's Tip: To get perfectly clean squares, wipe your knife with a warm, damp cloth between every single cut. The residual heat from the blade will melt through the glaze without shattering the crackly top.
Common Mistakes Checklist
- ✓ Ensure buttermilk and eggs are at room temperature to prevent the batter from curdling.
- ✓ Never skip sifting the powdered sugar; the glaze is too thin to hide lumps.
- ✓ Use a rimmed pan; a flat cookie sheet will result in a chocolate mess in your oven.
- ✓ Pour the glaze the second it's ready; it sets quickly as it cools.
- ✓ Let the cake cool completely before covering it, or the steam will make the glaze sticky.
Simple Swaps and Creative Twists
If you need to scale this recipe down for a smaller family dinner, you can easily halve the ingredients and bake it in a 9x13 inch pan. You’ll need to increase the bake time to about 25-30 minutes since the batter will be deeper.
When scaling up for a massive event, it's better to make two separate batches rather than doubling everything in one bowl; this ensures the boiling liquid is distributed evenly and the leavening agents don't lose their punch while you're prepping the second pan.
For a Mexican Hot Chocolate twist, add a teaspoon of ground cinnamon and a tiny pinch of cayenne pepper to the dry ingredients. It adds a sophisticated warmth that surprises people in the best way.
If you’re catering to a dairy-free crowd, you can substitute the butter with a high-quality vegan butter stick and use almond milk with a teaspoon of apple cider vinegar in place of the buttermilk. The texture will be slightly less rich but still incredibly moist.
| Premium Ingredient | Budget Alternative | Flavor Impact | Savings |
|---|---|---|---|
| Vanilla Bean Paste | Pure Vanilla Extract | Minimal; extract is great for baking | $15.00 |
| European Butter | Standard Store Brand | Slightly less fat; still very tasty | $4.00 |
| Toasted Macadamias | Chopped Pecans | Change in nut profile; pecans are classic | $10.00 |
Proper Storage and Zero Waste
This cake is a dream for make-ahead planning. You can keep it at room temperature, tightly covered with plastic wrap or foil, for up to 3 days. In fact, many people (myself included) think it tastes better on day two because the glaze has had time to fully marry with the cake.
If you need to keep it longer, store it in the fridge for up to 5 days, but let it sit on the counter for 20 minutes before serving to soften the butter in the glaze.
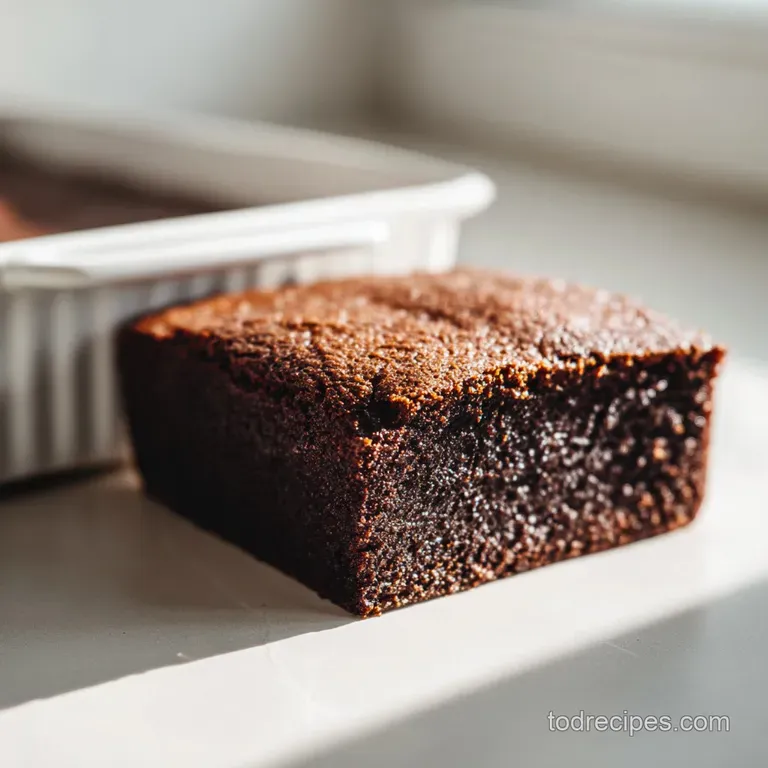
For long term storage, this sheet cake freezes beautifully. I recommend cutting it into squares first, then freezing them on a tray before transferring to a freezer safe bag. This prevents the glaze from sticking together. They’ll stay fresh for up to 3 months.
To use up any leftover crumbs or broken pieces, crumble them into vanilla ice cream or use them as a base for a chocolate trifle with layers of whipped cream and fresh berries.
Presentation Tips for Beautiful Slices
When you're serving a crowd, presentation is everything. While this cake is humble by nature, a few small touches can make it look like it came from a high end bakery. Instead of just dumping the pecans into the glaze, try sprinkling half of them on top after the glaze is poured.
This gives a nice visual contrast between the glossy chocolate and the matte nuts.
If you want to get really fancy, a light dusting of sea salt over the wet glaze can cut through the sweetness and highlight the chocolate. For a holiday touch, you can swap the pecans for crushed peppermint or festive sprinkles.
Just remember that the glaze sets fast, so whatever toppings you choose, have them ready to go before the cake leaves the oven.
Sheet Cake Myths
Myth: You must cream the butter and sugar for a light cake. Truth: While that's true for fluffy layer cakes, this sheet cake relies on the "two stage" boiling method. Melting the butter and boiling it with water creates a denser, fudgier texture that is characteristic of a traditional Texas sheet cake.
Creaming would actually introduce too much air, making the thin cake fragile.
Myth: Buttermilk makes the cake taste sour. Truth: The buttermilk reacts completely with the baking soda. This neutralization process removes the sour taste and leaves behind a tender crumb and a subtle richness. You won't taste "tang," you'll just notice that the cake is incredibly soft.
Myth: You should let the cake cool before frosting. Truth: This is the biggest mistake people make with sheet cakes! The glaze needs the heat of the cake to properly bond and seep into the surface.
If you wait for the cake to cool, the glaze will just sit on top like a thick sheet of plastic rather than becoming one with the dessert.

Recipe FAQs
What are some crowd pleasing potluck desserts?
Focus on high yield, shareable portions. Chocolate sheet cake is a classic choice because it is easy to slice into uniform squares, but you can also diversify your spread with handheld cheesecake bars for variety.
How many people will a 9x13 sheet cake serve?
This recipe actually serves 40 people. While a standard home style 9x13 pan often yields smaller portions, this specific formulation uses an 18x13 inch rimmed sheet pan to provide 40 generous squares.
What desserts are easy to make for a crowd?
Stick to recipes that feature pour over glazes. By avoiding complex decorations, you save massive amounts of time; this cake is ready in just 35 minutes total, making it one of the most efficient options for large gatherings.
What dessert can I bring to a Super Bowl party?
Bring something sturdy and portable like this chocolate sheet cake. It travels exceptionally well in its original rimmed sheet pan and holds up perfectly at room temperature throughout a game.
Is it true I must cool the cake before adding the frosting?
No, this is a common misconception. You must pour the hot glaze over the cake immediately after removing it from the 400°F oven, as the heat helps the glaze soak into the crumb for maximum moisture.
How to avoid lumps in the glaze?
Sift the powdered sugar thoroughly before mixing. Because the glaze is quite thin, it cannot mask lumps, and failing to sift will result in a grainy texture on top of your cake.
How to prevent the cake batter from curdling?
Ensure your buttermilk and eggs are at room temperature before mixing. Using cold ingredients directly from the refrigerator prevents the fats from emulsifying properly into the batter, which can impact the final texture.
Chocolate Sheet Cake
Ingredients:
Instructions:
Nutrition Facts:
| Calories | 188 kcal |
|---|---|
| Protein | 1.7 g |
| Fat | 9.5 g |
| Carbs | 25.5 g |
| Fiber | 0.9 g |
| Sugar | 19.6 g |
| Sodium | 63 mg |
