Favorite Chicken Potpie: Flaky and Creamy
- Time: Active 20 minutes, Passive 35 minutes, Total 55 minutes
- Flavor/Texture Hook: Flaky, golden crust with a rich, silky gravy center
- Perfect for: Cozy Sunday dinners or a quick weeknight copycat meal
- Making Every Layer Taste Velvety
- Important Recipe Details and Numbers
- Ingredients for This Budget Feast
- Essential Tools for Golden Crusts
- Cooking the Filling and Crust
- Solving Common Baking Disasters Fast
- Scaling This Dish for Crowds
- Delicious Ways to Customize It
- Debunking Old Kitchen Myths
- Storing and Freezing Your Leftovers
- Best Ways to Plate Up
- Recipe FAQs
- 📝 Recipe Card
Nothing ruins a Tuesday faster than pulling a pie out of the oven only to find a watery, pale mess where a golden crust should be. I remember the first time I tried making a chicken pie from scratch, I ended up with what I can only describe as "chicken soup in a bowl of wet dough." The bottom crust had completely dissolved into the filling because I didn't get the roux thick enough, and the vegetables were so mushy they basically became a paste.
It was a total disaster that sent us straight to the drive thru.
But that failure taught me the most important lesson in home cooking: moisture is the enemy of a crisp crust. This favorite chicken potpie is designed to fix those common mistakes with a few smart hacks that I've learned over years of trial and error.
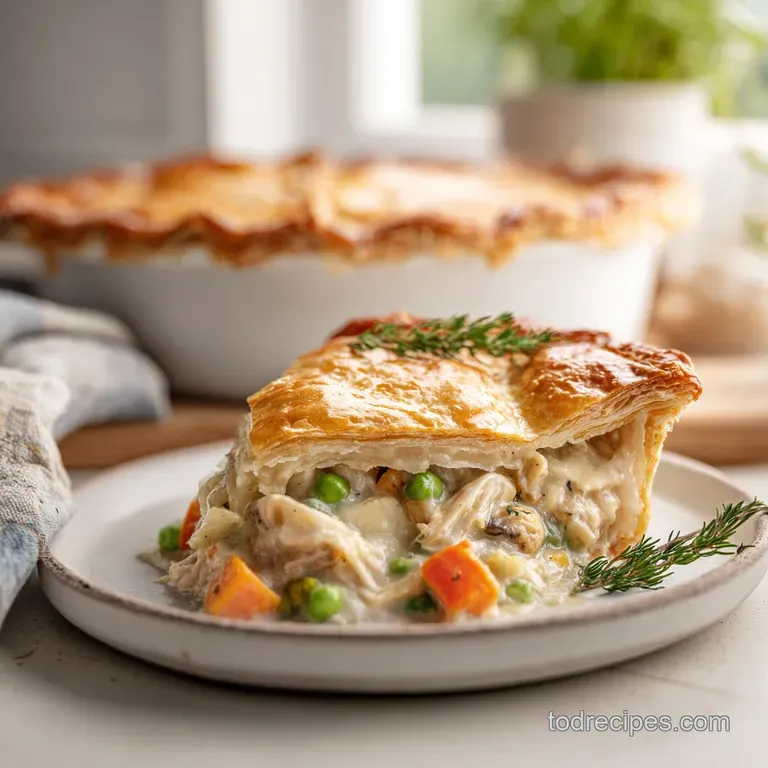
We are going for a double crust beast that stands tall, with a filling that stays velvety instead of running all over your plate. It is the ultimate comfort food, and because we use a rotisserie chicken, it feels like a total steal on your grocery budget.
You are going to love how the kitchen smells when the butter hits the garlic and sage. It’s that classic, savory aroma that makes everyone wander into the kitchen asking when dinner is ready.
We're skipping the complicated puff pastry from scratch and using high-quality refrigerated sheets, because honestly, when you're hungry on a weeknight, nobody has time for folding dough forty times. Let's get into what actually makes this pie hold its shape and keep its crunch.
Making Every Layer Taste Velvety
Starch Gelatinization: By cooking the flour in butter for exactly 2 minutes, we swell the starch granules so they can grab the chicken broth and milk, creating a stable, glossy gravy that won't separate.
over High heat Vaporization: Starting the oven at 400°F (200°C) causes the water in the pie crust to turn into steam instantly, pushing the layers of dough apart for a flaky shatter.
Fat Flour Balance: Using equal parts butter and flour creates a blonde roux that provides maximum thickening power without the "raw flour" aftertaste that ruins many home cooked sauces.
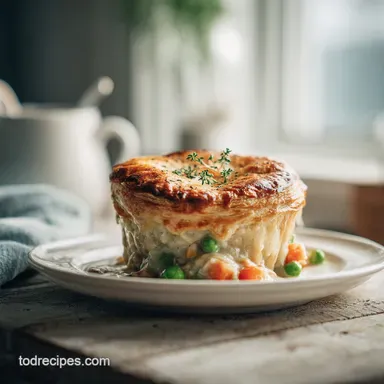
Steam Ventilation: Cutting large vents in the top pastry sheet allows internal steam to escape, preventing the crust from becoming soggy from the inside out.
| Thickness | Internal Temp | Rest Time | Visual Cue |
|---|---|---|---|
| 2 inch pie | 165°F (Filling) | 10 minutes | Filling bubbles slowly through vents |
| 1.5 inch pie | 160°F (Filling) | 8 minutes | Crust turns deep mahogany gold |
| Deep Dish | 170°F (Filling) | 15 minutes | Gravy stops "jiggling" when shaken |
When you are looking for a quick decision on how long to leave this in the oven, remember that the filling is already cooked. Your main goal is the crust. If you pull it too early, that bottom layer will stay doughy and raw.
Waiting for those bubbles to peek through the vents is the secret signal that the heat has reached the very center of the pie.
Important Recipe Details and Numbers
Getting the internal structure of a pie right is more about the ingredients' roles than just their flavors. We use a specific ratio of liquids to fats to ensure that the gravy is thick enough to support the weight of the chicken and vegetables.
If the gravy is too thin, it will soak into the bottom crust before the oven heat has a chance to set the dough.
| Ingredient | Science Role | Pro Secret |
|---|---|---|
| All Purpose Flour | Thickening Agent | Cook it until it smells like toasted nuts to remove the "chalky" flavor. |
| Unsalted Butter | Fat & Flavor | Using unsalted lets you control the seasoning precisely so the pie isn't a salt bomb. |
| Chicken Broth | Liquid Base | Use low sodium versions to leave room for the savory notes of the sage and thyme. |
| Whole Milk | Emulsifier | The fat in whole milk creates a silkier mouthfeel than skim or 2% could ever manage. |
The interaction between the whole milk and the chicken broth is what gives us that "copycat" steakhouse quality. While some people use heavy cream, I find that whole milk keeps the filling light enough that you can actually eat a whole slice without feeling weighed down.
It's all about that balance between rich and readable.
Ingredients for This Budget Feast
This recipe focuses on using what you likely already have or can grab quickly at a budget friendly store. The rotisserie chicken is the real MVP here, providing pre seasoned, tender meat that would take hours to replicate at home.
- 2 sheets refrigerated pie crust pastry: Look for the rolls in the dairy aisle. Why this? It provides consistent flakiness without the labor of homemade dough. (Substitute: Frozen puff pastry for a lighter, more airy top).
- 3 cups (450g) rotisserie chicken, shredded: Use a mix of white and dark meat. Why this? It's already cooked, seasoned, and extremely tender. (Substitute: Leftover roast turkey or poached chicken breasts).
- 1 cup (150g) carrots, diced: Keep them small for even cooking. Why this? Adds natural sweetness and a necessary crunch. (Substitute: Parsnips for an earthy twist).
- 1 cup (150g) frozen peas: Don't thaw them beforehand. Why this? They hold their shape and pop of color better than canned. (Substitute: Frozen corn or green beans).
- 1/2 cup (75g) celery, sliced: The backbone of any good savory base. Why this? Provides that classic aromatic foundation. (Substitute: Chopped fennel for a slight licorice note).
- 1 small yellow onion, minced: Smaller pieces melt into the gravy. Why this? It provides a savory depth without large chunks. (Substitute: Shallots or leeks for a milder flavor).
- 3 cloves garlic, grated: Grating gets the flavor into every bite. Why this? Grating releases more oils than chopping. (Substitute: 1 tsp garlic powder in a pinch).
- 1/3 cup (75g) unsalted butter: The base of our roux. Why this? Controls the salt level while adding rich flavor. (Substitute: Salted butter, but reduce added salt by half).
- 1/3 cup (45g) all purpose flour: Our primary thickener. Why this? Standard protein content is ideal for roux. (Substitute: gluten-free 1:1 baking flour).
- 1 3/4 cups (415ml) low sodium chicken broth: The savory liquid. Why this? Low sodium prevents the pie from becoming over salted. (Substitute: Vegetable broth or chicken bouillon with water).
- 2/3 cup (160ml) whole milk: For that creamy finish. Why this? Provides enough fat for a velvety texture. (Substitute: Half and half for a much richer pie).
- Spices: 1 tsp dried thyme, 1/2 tsp rubbed sage, 0.5 tsp salt, 0.25 tsp cracked black pepper. Why this? These are the "Thanksgiving" herbs that define the flavor. (Substitute: Poultry seasoning blend).
- Egg Wash: 1 large egg + 1 tbsp water. Why this? Gives the crust that professional golden shine. (Substitute: Milk or heavy cream brush).
Essential Tools for Golden Crusts
You don't need a high end kitchen to pull this off, but a few specific tools make the process much smoother. I personally love using a 9 inch deep dish pie plate because it allows for more of that velvety filling, but a standard pie tin works too.
Just make sure it’s oven safe to at least 425°F (220°C).
A large saucepan is necessary for building the filling. You want something with enough surface area to sauté the vegetables but deep enough to whisk in the broth without splashing. A balloon whisk is better than a fork here; it helps break up any flour clumps during the gravy making phase.
If you're using a cast iron skillet, you can actually bake the pie directly in the skillet for a rustic, steakhouse look.
Finally,, grab a pastry brush. While you can use your fingers or the back of a spoon to apply the egg wash, a brush ensures an even coating. This is what prevents splotchy browning. If you don't have one, a clean, unused small paint brush from a craft kit works in a total pinch. Just make sure you wash it well first!
Cooking the Filling and Crust
- Prep the heat. Preheat your oven to 400°F (200°C). Prepare a 9 inch deep dish pie plate by lining it with the bottom pastry sheet. Note: This ensures the dough starts cold when it hits the hot oven, maximizing the flake.
- Sauté the aromatics. In a large saucepan, melt 1/3 cup butter over medium heat. Add the minced onion, diced carrots, and sliced celery. Sauté for 5-7 minutes until the onions are translucent and carrots have softened slightly.
- Add the herbs. Stir in the grated garlic, dried thyme, and rubbed sage during the last minute of cooking. Note: Toasting the herbs in the butter releases their fat soluble flavor compounds.
- Create the roux. Sprinkle 1/3 cup all purpose flour over the cooked vegetables. Stir constantly for 2 minutes until the flour no longer smells raw and looks like a light paste.
- Whisk the liquids. Slowly whisk in the 1 3/4 cups chicken broth and 2/3 cup whole milk. Continue to simmer and whisk 3-4 minutes until the mixture thickens into a glossy gravy that coats the back of a spoon.
- Fold the proteins. Remove the saucepan from heat. Fold in the 3 cups of shredded rotisserie chicken and 1 cup of frozen peas. Season with salt and cracked black pepper to taste.
- Fill the pie. Pour the filling into the prepared bottom crust. Note: Don't overfill past the rim or it will boil over and smoke in your oven.
- Seal the lid. Place the second pastry sheet over the top. Trim, seal, and flute the edges. Cut several large vents in the top crust until you can see the filling beneath.
- Apply the finish. Beat the egg with 1 tbsp water to create an egg wash. Brush the entire top crust generously.
- Bake and rest. Bake for 30-35 minutes until the crust is a deep golden brown and the filling is bubbling through the vents. Let the pie rest for 10 minutes before slicing.
Solving Common Baking Disasters Fast

Even with a "fail proof" recipe, things can go sideways. The most common issue I hear about is the filling being too runny. Usually, this happens if the roux wasn't cooked long enough or if the broth was added too quickly.
If you notice your filling is looking like soup before it goes in the pie, keep simmering it for another 2-3 minutes. It should be thick, almost like a heavy porridge.
Why Your Crust Is Soggy
If the bottom of your pie is mushy, it's almost always a temperature issue. If your oven isn't fully preheated to 400°F (200°C), the fat in the pastry will melt before the starch sets, leading to a greasy, wet bottom.
Also, if you use a glass pie dish, it takes longer to heat up than metal or ceramic. Try placing your pie dish on a preheated baking sheet; this acts as a "heat floor" that blasts the bottom crust with immediate warmth.
Why Your Filling Is Dry
A dry filling usually means the pie was overbaked or the roux was too thick. Remember, the filling will thicken further as it rests. If you find your gravy has disappeared into the chicken, next time add an extra 1/4 cup of broth.
Also, ensure you are using rotisserie chicken that isn't already dried out from sitting under a heat lamp for too long.
| Problem | Root Cause | Solution |
|---|---|---|
| Filling leaks out | Vents are too small or edges weren't sealed. | Cut larger "X" shapes in the top and crimp edges with a fork. |
| Top crust burns | Oven rack is too high or sugar in dough. | Tent with aluminum foil halfway through baking if it's too dark. |
| Bottom is raw | Oven temp too low or cold filling. | Use a dark metal pan or preheat a baking sheet to sit the pie on. |
Common Mistakes Checklist:
- ✓ Don't skip the 10 minute rest after baking; this is when the gravy actually sets.
- ✓ Avoid over mixing the filling once the chicken is added to keep the chunks intact.
- ✓ Ensure the egg wash is thin and even; pools of egg will cook into rubbery patches.
- ✓ Use cold pie crust; if the dough gets too warm while you're prepping, pop it in the fridge for 10 minutes.
- ✓ Never use canned peas; they are too soft and will disintegrate into the gravy.
Scaling This Dish for Crowds
If you are feeding a larger family or hosting a potluck, you can easily double this recipe. However, don't just double the time! If you move to two separate 9 inch pies, they can usually bake at the same time on different racks. Just swap their positions halfway through to ensure even browning. If you're looking for other ways to use up that rotisserie chicken, you might enjoy my Baked Chicken Tenders recipe which uses a similar "easy prep" mindset.
When doubling the spices, be careful. I usually recommend only using 1.5x the amount of salt and pepper and tasting as you go. Spices can become overwhelming when scaled up linearly. For the liquids, you can stick to the 2x ratio, but keep an eye on the thickness of the roux.
Sometimes a larger batch takes a few extra minutes to reach that "glossy" stage because of the sheer volume of liquid being heated.
If you are scaling down for just two people, I recommend making the full filling but only baking half of it in two individual ramekins. You can freeze the other half of the filling in a freezer bag for a quick meal later. This prevents the "leftover pie" slump where the crust gets soft in the fridge.
Delicious Ways to Customize It
While the traditional version is a classic for a reason, you can definitely play with the flavor profile. If you want something a bit more sophisticated, try adding a splash of dry white wine (like Sauvignon Blanc) to the vegetables after they've sautéed but before you add the flour.
This adds a bright acidity that cuts through the richness of the butter and milk.
For a different flavor profile altogether, you could try a Balsamic Glazed Chicken recipe approach by adding a teaspoon of balsamic vinegar to the gravy at the very end. It sounds strange, but that tiny hit of acid makes the savory notes of the chicken really pop.
The Shortcut Casserole
If you're in a massive rush, skip the bottom crust. Pour the filling into a 9x13 baking dish and just top it with one layer of pastry or even pre made refrigerated biscuits. This turns it into a chicken potpie cobbler. It's much faster because you aren't worrying about sealing edges or a soggy bottom.
The dairy-free Swap
You can make this dairy-free by using a high-quality vegan butter stick and unsweetened oat milk. Oat milk is the best substitute here because it has a natural creaminess and thickness that almond or soy milk lacks.
Just make sure the oat milk is "extra creamy" or "full fat" to mimic the whole milk in the original recipe.
| Premium | Budget | Flavor Impact | Savings |
|---|---|---|---|
| Fresh Leeks | Yellow Onion | Slightly more earthy, mild | Save $2.50 |
| Heavy Cream | Whole Milk | Milk is lighter, less fatty | Save $3.00 |
| Fresh Herbs | Dried Herbs | Dried are more concentrated | Save $4.00 |
Debunking Old Kitchen Myths
One big myth is that you need to "blind bake" (pre bake) the bottom crust for every pie. While that's true for custard pies, for a chicken potpie, the high heat and the thick filling should prevent the need for it. As long as your filling isn't watery and your oven is hot, the bottom will cook through just fine.
Another misconception is that you have to use chicken breast. Honestly, the best favorite chicken potpie uses a mix of light and dark meat. The dark meat stays much juicier during the 35 minutes in the oven, whereas pure breast meat can sometimes become "stringy" if the pie is overbaked by even a few minutes.
Finally, people often think the "egg wash" is just for looks. It actually serves a functional purpose! The proteins in the egg create a seal on the dough that helps trap steam inside the crust, which contributes to that internal puff and flake.
It also helps the salt and pepper you might sprinkle on top actually stick to the dough.
Storing and Freezing Your Leftovers
Leftover chicken potpie is actually great the next day, though the crust will never be quite as "shatter crisp" as it was fresh out of the oven. Keep it in the fridge for up to 4 days, covered tightly with foil or plastic wrap.
When you're ready to eat it again, I highly recommend using the oven or an air fryer instead of the microwave.
To reheat in the oven, go for 350°F (180°C) for about 15-20 minutes. This helps the crust crisp back up. If you use a microwave, the crust will become soft and chewy it still tastes good, but you lose that texture we worked so hard for.
Zero Waste Tip: Don't toss the bones from that rotisserie chicken! Throw them in a pot with some water, scrap ends of onions, and celery tops to make your own stock for the next time you make this recipe. It’s free flavor that most people just throw in the trash.
Best Ways to Plate Up
When it comes to serving, this pie is pretty much a complete meal on its own since it has protein, carbs, and veggies. However, a light, acidic side dish helps balance the heavy, savory nature of the gravy. A simple green salad with a lemon vinaigrette is my go to.
It cleanses the palate between bites of rich crust and creamy chicken.
If you are feeling extra hungry, a side of roasted broccoli or even some extra mashed potatoes (if you really want to go all out on the comfort) works well. But honestly, most of the time at my house, we just serve a big wedge of the pie in a shallow bowl.
The bowl is key because it catches any of that velvety gravy that might try to escape.
Wait the full 10 minutes before you cut into it. I know it's hard when the whole house smells like a steakhouse, but if you cut it too early, the filling will run everywhere and your bottom crust will lose its structural integrity.
Patience is the final ingredient that makes this the "favorite" version of the dish!

Recipe FAQs
How to ensure the crust turns out golden brown?
Brush the top crust with an egg wash. Whisk one egg with one tablespoon of water and apply it generously to the entire surface before baking at 400°F.
How to prevent the filling from becoming too thin or runny?
Cook the flour and butter roux for at least two minutes. This process toasts the flour to ensure it thickens the broth and milk into a glossy gravy that properly binds the shredded rotisserie chicken and vegetables.
Is it necessary to use a deep dish pie plate?
Yes, use a 9 inch deep dish plate. This provides enough volume to contain the three cups of chicken, the vegetable mixture, and the thickened gravy without overflowing during the 30 35 minute bake time.
How to tell when the chicken potpie is finished baking?
Look for a deep golden brown crust and bubbling filling. The filling must be visibly simmering through the vents you cut in the top pastry to ensure the ingredients are heated through.
How to serve leftover chicken potpie without the crust getting soggy?
Reheat slices in a 350°F oven for 15 20 minutes. Avoiding the microwave preserves the texture of the pastry, similar to how we achieve perfectly set textures in our layered casserole dishes.
Can I prepare the filling in advance to save time?
Yes, cook the filling mixture ahead of time. Once you have made the gravy with the chicken, peas, and aromatics, let it cool completely before filling the pastry sheets to prevent the bottom crust from becoming gummy.
Is it possible to skip the 10-minute resting period after baking?
Favorite Chicken Potpie
Ingredients:
Instructions:
Nutrition Facts:
| Calories | 432 kcal |
|---|---|
| Protein | 20.2 g |
| Fat | 25.8 g |
| Carbs | 30.5 g |
| Fiber | 2.1 g |
| Sugar | 3.2 g |
| Sodium | 485 mg |
